Hex Bolt Installation Guide | A Complete Guide
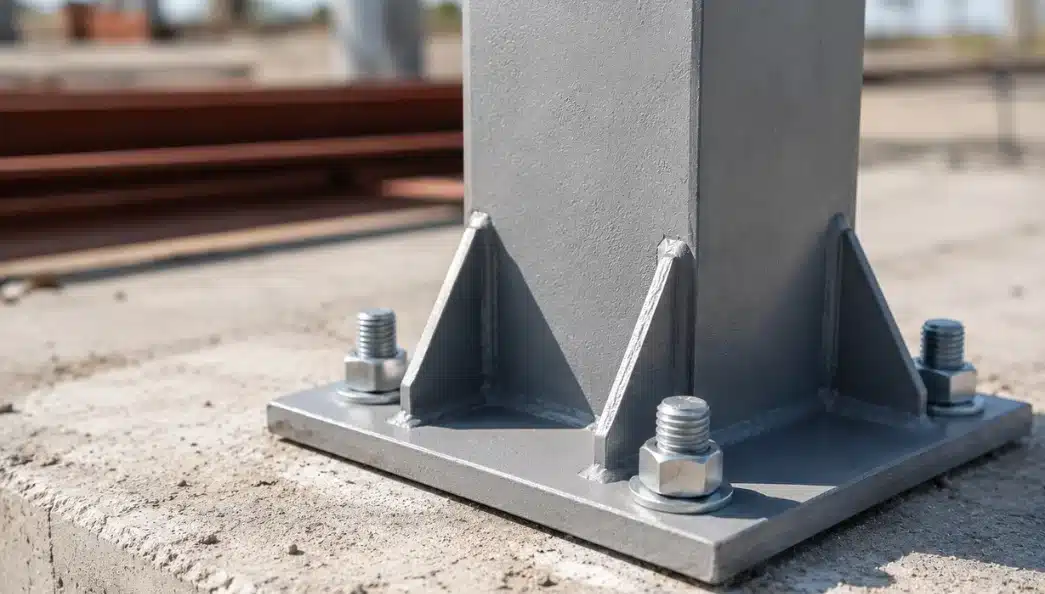
Simple Guide for Putting in Hex Bolts: Steps, Tightness, and Smart Tips Request a Quote Whether you are putting up steel frames, connecting water pipes, or fixing heavy machines for oil and gas projects, you must know how to use a hex bolt. Doing this right is a key skill for any worker on a job. When a bolt stays too loose, it can wobble and drop off later. But if you twist a bolt too hard, it can snap, strip its ridges, or crush the objects you are holding together. Both errors cost lots of cash and can hurt people at work. This hex bolt installation guide shows you all the basics: what this bolt is, the gear you need, how to put it in, how hard to twist it, bad habits to avoid, and how to keep them working. What is a Hex Bolt? A hex bolt is a tough pin with a six-sided top and a body full of ridges called threads. You use a handy wrench or a socket tool to hold the top and turn it. The ridged body spins into a nut or a matching hole. This action squeezes two or more parts together so they cannot move. Workers make these bolts out of many types of metal. This helps them fit different jobs and carry heavy loads without breaking. At Petrofast Middle East FZC sells hex bolts made of tough carbon steel, mixed alloy steel, and clean stainless steel are available. They even sell unique metals made for very hot spots or places that get rusty fast. These bolts come with many outer layers like hot zinc dip, shiny zinc plate, yellow coat, dark black finish, or bright stainless metal. Every special coat helps stop wet weather and rust from destroying the bolt. Tools Needed for Installing Hex Bolts Having the right tools on hand before you begin makes the process faster, more accurate and safer. Below are the main hex bolt tools used in a typical installation: Torque Wrench: The most critical tool of any hex bolt tightening procedure. It lets you apply a certain , measured amount of torque to the bolt so it is not too loose and not over-tightened .Socket Set and Open-End Wrenches: These are used for holding the nut while the bolt is tightened from the other side, or for driving the bolt itself. Impact Wrench (if applicable): For faster pre-tightening in structural and heavy-duty applications. Always verify the final torque with a torque wrench. Thread Gauge: Measures the thread pitch to ensure the bolt matches the receiving thread before installation. Lubricant / Thread Compound: Used on threads to reduce friction, ensure uniform torque readings and prevent galling especially in stainless steel applications. Hardness Tester: In professional quality-controlled environments, a hardness tester (e.g. the FIE Hardness Tester used in the company’s own production facility, Petrofast) is used to check material properties prior to installation in critical applications. Hardness Tester: They are used to clean bolt holes and mating surfaces prior to installation. Hex Bolt Installation Process Step by Step This bolt installation guide will help you get it right and reliable every time. Step 1: Inspect the Bolt and Parts Check visually and dimensionally before installing any bolt. Confirm: The bolt grade and size match the design requirement The threads are clean and unbroken and are free of debris The bolt hole is free and the right size Mating surfaces are flat, burr and scale free Step 2: Compatibility Test Ensure that the bolt / nut and washer combination are compatible. Incorrect components can result in inaccurate torque readings and joint failure. In structural applications, the nut grade should be the same as the bolt grade and a flat washer should be used to distribute the clamping load properly. Step 3: Put on Thread Grease If You Need It Rub a good grease or a special anti-stick paste onto the bolt ridges if your project gets very hot, sits in wet weather, or uses stainless steel. This step is super important for extra-strong stainless metals. If you spin those bolts too fast while they are dry, the metal can heat up, scrape, and lock up before it is even tight. Step 4: Twist by Hand First Put the bolt into the hole and spin it with your fingers until it sits tight against the flat washer and the joint wall. Do not use any tools for this part. The main goal here is to make sure the bolt goes in straight and lines up perfectly so you do not ruin the metal ridges. Step 5: Snug It Up Take your hand wrench or power tool and tighten all the bolts until they are snug. This means they are firm, but not at their final tightness yet. If you are working on a piece with many bolts, like a pipe ring or a base plate, always tighten them in a crisscross or star-shaped pattern. This spreads the squeezing force evenly. Step 6: Twist to the Final Tightness Use a special tool called a torque wrench that measures tightness. Twist each bolt until it hits the exact number you need. Keep using that same crisscross pattern for joints with many bolts. Never skip a bolt and never tighten them in a simple circle, because that makes one side way too heavy and uneven. Step 7: Check and Mark Your Work Look over the tightness one last time with your wrench if your job rules tell you to. Then, draw a straight line across the nut and the bolt head using a paint marker. This line acts as a witness mark, so anyone can look at the bolt later and see if it has started to loosen or spin out of place. What Torque is Needed for Hex Bolts? The single most important aspect of a successful installation is to nail the hex bolt torque. Torque is the turning force you apply to the bolt and is what generates